Picaxe Weather Station Repeater
If you're wondering what a project titled "Picaxe Weather Station Repeater" is doing in the Arduino section of my website, I'll explain:
I designed and built the original Picaxe Weather Station back in April 2011 before I was aware of the existence of the Arduino. The Picaxe microcontrollers have a lot going for them, in particular specific programming commands make them comparatively easy to interface with some hardware but, from my perspective at least, they are let down by their limited mathematics capabilities.
While some people seem to relish the challenge of converting complex formulas that are often required by weather sensors into 16-bit integer-only mathematics, it's a challenge I can do without. And this above all else is, in my opinion, where the Arduino wins out. Based on the C++ programming language with a virtually unlimited number of variables and variable types, dealing with complex formulas involving floating point numbers becomes a breeze. Additionally, the Arduino's ATMEL chips run programs in native machine code language, rather than the Picaxe's interpreted BASIC code, so execution speed is rarely an issue.
Overview of the Original Picaxe Weather Station
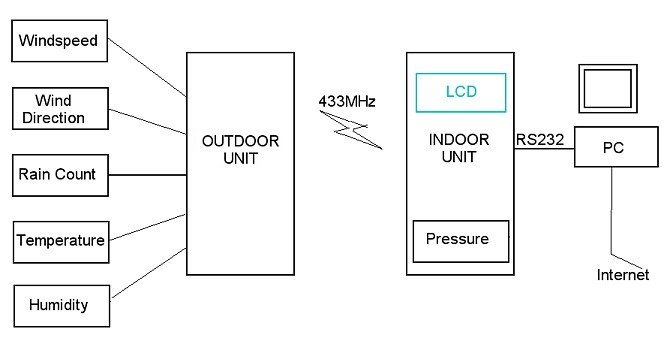
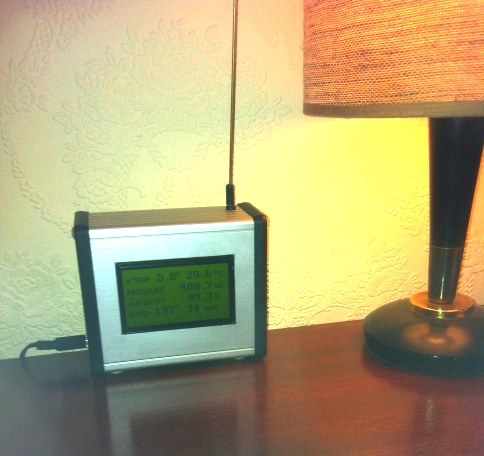
Looking at the overview of the Picaxe weather station, you can see that the "indoor unit" receives all of its data except the atmospheric pressure from the outdoor unit via a 433MHz licence-exempt wireless link.
The setup works fine, as far as it goes, but the location of the indoor until is limited by its RS232 tether to the PC in order to provide the online weather data.
I decided that I wanted a second indoor unit which I could locate anywhere within wireless range of the outdoor unit - most usefully in the living room. The obvious option was to simply build another identical Picaxe indoor unit but the maths involved with the atmospheric pressure sensor that I had available (not the same type as I'd used with the Picaxe) simply didn't lend itself to the Picaxe integer maths. It would be much simpler to build the second indoor unit based on the Arduino - or, rather, the ATmega328.
One potential problem was that the data from the outdoor 433MHz transmitter was encoded using a Picaxe "Manchester encoder" board. I had a spare Manchester receiver board so the first test was to confirm whether it would interface with the Arduino ATmega328 microprocessor. The only issue I found was that the polarity of the transmitted serial data from the outdoor unit is inverted. Luckily, the Arduino SoftwareSerial library has the option to invert the data:
  // SoftwareSerial wireless(Rx, Tx, Invert);

     SoftwareSerial wireless(10, 11, 1);          // Picaxe Manchester decoder data is inverted
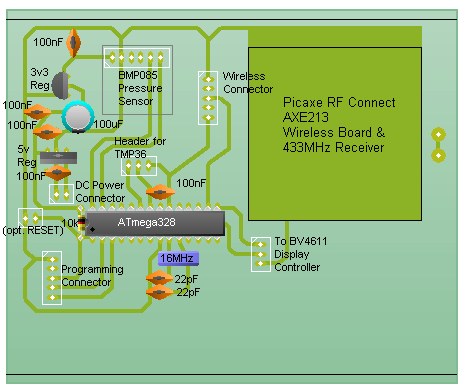
The Pressure Sensor
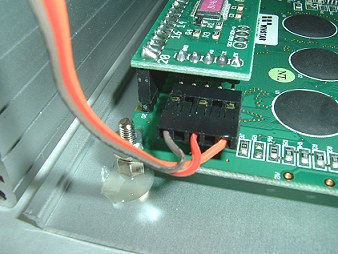
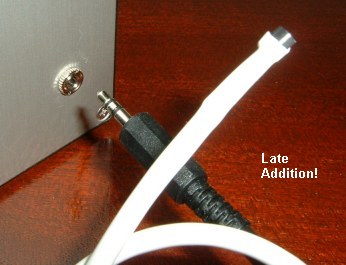
I used a BMP085 in this, second, indoor unit. Using it with the Arduino is easy as there's an Adafruit Library especially for it. As it's able to measure temperature as well, initially I used it to display the indoor temperature (which the Picaxe unit lacked) but it turned out that the electronics in the enclosure generated enough heat to throw the reading off by several degrees. To get around this, I fitted a 3.5mm stereo socket to the enclosure into which I plugged a TMP36 analogue temperature sensor on a short 3-core lead and connected it internally to the ATmega328 analog input A0, 5v and GND.The PCB layout diagrams shown below reflect this modification although it's not shown on the photographs. (In my prototype, I just soldered the 3 wires from the 3.5mm socket to the appropriate pads on the back of the PCB).
Slightly more accuracy could be achieved by hooking up the TMP36 and the ATmega328 AREF pin to 3.3 volts but that sort of accuracy wasn't considered necessary for this application.
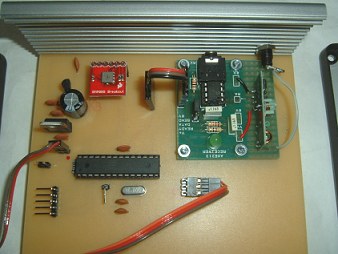
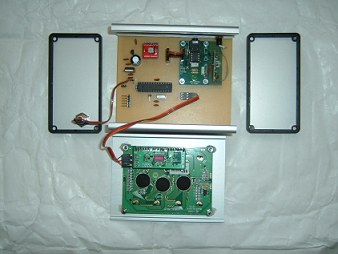
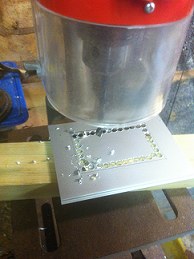
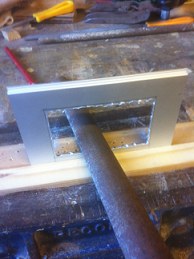
Construction

| 128 x 64 Graphical Display | Rapid online |
| 128 x 64 VT100 Serial Converter (BV4611) | ByVac.com |
| BMP085 Pressure Sensor | ebay etc |
| 5v LDO Regulator L4940V5 | CPC, etc |
| 3v3 Regulator MCP1702-330E2E | Farnell, etc |
| Aluminium Instrument Enclosure 120x100x50 | Farnell |
| Picaxe AXE213 RF Connect Kit (only Rx board & parts are required) | Picaxe |
| 433MHz Receiver | DealExtreme, ebay, etc |
Ideally, the 433MHz receiver would be identical to the one used in the original Picaxe indoor unit. However, I found one from DealExtreme - although a different design - worked fine. Some experimentation may be needed to make sure it receives a good signal in its desired location.
#include <SoftwareSerial.h>
#include <Wire.h>
#include <Adafruit_BMP085.h>

#define ESC "\x1B"                      // VT100 Escape code for LCD serial controller

int tmp36 = A0;                         // Analogue temperature sensor

float tmpReading = 0;

Adafruit_BMP085 bmp;                    // Pressure/ Indoor temperature breakout board.

SoftwareSerial wireless(10, 11, 1);     // Picaxe Manchester decoder data is inverted
SoftwareSerial lcd(8, 9);               // Serial for graphical LCD

int softDelay;

char buf[10];                           // Character buffer used for float to string conversion

int index1;                             //
int arr1[10];                           // Integer array for harvesting data from wireless
boolean startflag1 = false;             // Start and End flags are sent from Picaxe transmitter
boolean endflag1 = false;

int index2;
byte arr2[10];                          // Second array for 2nd block of wireless data
boolean startflag2 = false;
boolean endflag2 = false;

boolean wirelessActive = false;
boolean wirelessFlag = 0;

unsigned long ledTimer;
unsigned long timer;

float temperatureC = 0.0;
float lastPressure = -99;
float lastHumidity = -99;

void setup() {

  softDelay = 10;

  delay(500);
  bmp.begin();                          // Initialise pressure/temperature sensor
  lcd.begin(9600);                      // Initialise serial comms to graphical LCD
  wireless.begin(2400);                 // Initialise wireless receiver serial port

  lcd.write(13);                        // Give the LCD serial controller a kick
  delay(500);
  lcd.write(13);                        // Give the LCD serial controller a kick
  delay(500);

  lcd.print(ESC "[?26n");               // Stop the display scrolling
  lcd.print(ESC "[H");                  // Cursor Home
  lcd.print(ESC "[?26h");               // Backlight On
  delay(softDelay);
  lcd.print(ESC "[3J");                 // Clear screen and reset display
  lcd.print(ESC "[?25I");               // Cursor OFF
  lcd.print(ESC "[5;6H");
  delay(softDelay);
  lcd.print(ESC "(3");
  lcd.println("HELLO");
  delay(3000);
  lcd.print(ESC "[3J");                 // Clear screen and reset display
  lcd.print(ESC "(1");                  // Set standard font size
  delay(softDelay);
  lcd.print(ESC "{7;5p");               // Position cursor at a pixel level
  lcd.print("TEMP");                    // Print main 'headings'
  delay(softDelay);

  lcd.print(ESC "{0;21p");              // Note: There is no hardware handshaking and, for
  lcd.print("PRESSURE");                // simplicity, the display's serial controller ACK
  delay(softDelay);                     // function isn't used. To avoid the buffer overflowing
                                        // delays are included after each block of data.

  lcd.print(ESC "{0;36p");
  lcd.print("HUMIDITY");

  delay(softDelay);

  lcd.print(ESC "{0;51p");
  lcd.print("WIND");
  delay(100);
}


void loop() {

  // The format of the incoming data from the wireless decoder is dictated by the original
  // Picaxe wireless transmitter. It consists of two 8-byte block each with a startflag
  // and an endflag. Picaxe serial in/out is simpler to implement so the Arduino has to
  // replicate the Picaxe serial functions in code and re-create the two 8-byte blocks.

  byte digit;
  index1 = 0;
  index2 = 0;
  wirelessActive = 0;

  while (wireless.available()) {
    wirelessActive++;
    digit = wireless.read();                    // Read one byte from serial buffer
    if (digit == 't') startflag1 = true;        // Start of temperature & humidity block
    if (digit == 'B') endflag1 = true;

    if ((startflag1) && (!endflag1)) {          // Startflag found so start filling
      arr1[index1] = digit;                     // the array until the endflag.
      index1++;
    }

    if ((endflag1) || (index1 > 9)){
      index1 = 0;
      endflag1 = false;
      startflag1 = false;
    }
    //=====================================================
    if (digit == 'm') startflag2 = true;         // Start of wind direction & speed block
    if (digit == 'C') endflag2 = true;           // Endflag

    if ((startflag2) && (!endflag2)) {
      arr2[index2] = digit;
      index2++;
    }

    if ((endflag2) || (index2 > 9)){
      index2 = 0;
      endflag2 = false;
      startflag2 = false;
    }

 }

  lcd.print(ESC "{0;5p");               // Position cursor at a pixel level
  delay(softDelay);
  if (wirelessActive) {
     wirelessFlag == true ? lcd.print(" ") : lcd.print("*");
     wirelessFlag = !wirelessFlag;
  }
  // All data is in from the wireless decoder - position LCD cursor and begin parsing data.

  lcd.print(ESC "(3");                           // Set large font

  float dec = arr1[3];                           // This is the decimal part of the
  dec = dec / 10;                                // temperature from the wireless data.

  float temperature = (arr1[2] + dec);           // Whole number plus decimal part.
  lcd.print(ESC "{31;0p");
  delay(softDelay);
  lcd.print(ESC "[K");

  if (arr1[1] == '-') temperature = -temperature;
  printPx(temperature, 1, 29, 0);                // Send to LCD one character at a time

  lcd.print(ESC "{66;4p");
  lcd.print(ESC "{2C");                          // Draw a circle. (Degree symbol)


//  float t = bmp.readTemperature();             // Get indoor temperature from pressure/temp sensor
//  if (lastT == -99) lastT = t;

// Measuring temperature with the internal pressure/temp sensor proved to be inaccurate due to
// heat from some of the components, particularly the 5v LDO regulator.
// Therefore, I attached a TMP36 analogue temperature sensor via a 3.5mm stereo jack socket fitted
// to the case.  Tip to sensor, ring to 5v, sleeve to 0v.

  tmpReading =  analogRead(tmp36);              // Read analogue voltage from external TMP36
  delay(10);
  tmpReading = 0;
  for (int i = 0; i < 20; i++) {
    tmpReading = tmpReading + analogRead(tmp36);
    delay(5);
  }
  tmpReading = tmpReading / 20;

  float voltage = tmpReading * 5.0;
    voltage /= 1024.0;
    temperatureC = (voltage - 0.5) * 100 ;      //converting from 10 mv per degree wit 500 mV offset
                                                //to degrees ((voltage - 500mV) times 100)

  lcd.print(ESC "{76;0p");                      // Reposition cursor for indoor temperature.
   lcd.print(ESC "[K");                         // Clear previous reading.

//    printPx(t, 1, 76, 0);                     // Temperature from internal pressure/temp sensor
  printPx(temperatureC, 1, 76, 0);              // Temperature from external  TMP36

  lcd.print(ESC "{117;5p");
  lcd.print(ESC "{2C");
  lcd.print(ESC "{122;5p");
  lcd.print(ESC "(1");

  delay(softDelay);
  lcd.print("C");

  lcd.print(ESC "(3");
  lcd.print(ESC "{58;16p");
  lcd.print(ESC "[K");


  float pressure =bmp.readPressure();
  pressure = pressure / 100;

  if (lastPressure = -99) lastPressure = pressure;
  if (abs(pressure - lastPressure) < 2) {
    if (pressure < 1000) lcd.print(" ");
    printPx(pressure, 1, 67, 16);
  }

  delay(softDelay);
  lcd.print(ESC "{115;21p");
  lcd.print(ESC "(1");

  lcd.print("mB");
  delay(softDelay);

  dec = arr1[5];
  dec = dec / 10;

  float humidity = (arr1[4] + dec);
  if (lastHumidity = -99) lastHumidity = humidity;

  lcd.print(ESC "(3");
  delay(softDelay);
  lcd.print(ESC "{76;35p");
  lcd.print(ESC "[K");

  if (abs(humidity - lastHumidity) < 5) {
    lcd.print(ESC "{76;31p");
    printPx(humidity, 1, 76, 31);
  }
  lcd.print(ESC "(1");
  lcd.print(ESC "{115;35p");
  lcd.print("%");

  int dir;

  dir = (arr2[1] * 256) + arr2[2];
  dir = map(dir, 0, 1023, 0, 360);

  lcd.print(ESC "(3");
  delay(softDelay);

  lcd.print(ESC "{30;55p");
  lcd.print(ESC "[K");
  if ((dir >=0) && (dir <360)) {
    printPx(dir, 0, 22, 46);
  }
  delay(softDelay);

  lcd.print(ESC "{62;48p");

  lcd.print(ESC "{2C");
  delay(softDelay);

  int speed = (arr2[3] * 256);
  speed += arr2[4];
  speed = int(speed * 3.6);
  if (speed >= 0) {
    lcd.print(ESC "{75;50p");
    lcd.print(ESC "[K");
    if (speed < 10) {
      lcd.print(ESC "{83;46p");
    } else {
      lcd.print(ESC "{75;46p");
    }
    lcd.print(speed);
  }

  lcd.print(ESC "(1");
  lcd.print(ESC "{100;51p");

  lcd.print("mph ");
  delay(softDelay);
  lcd.print(ESC "[?25I");               // Cursor OFF

  delay (5000);
}

// Send floats and integers to the LCD one characer at a time and adjust spacing.

void printPx(float value, int dp, int px, int py) {
  if (value >= 1000) {
    px = px - 9;
  }

  dtostrf(value, 4, dp, buf);                      // float or integer to characters
  int idx = 0;
  char str[5];
  while(buf[idx] != 0) {
     lcd.print(buf[idx]);                          // send character to LCD
     delay(1);
     idx++;
     lcd.print(ESC "{");                           // send cursor positioning code to LCD
     if ((idx > 0) && (buf[idx-1]) == '.') {       // closer spacing if following decimal point.
        lcd.print(itoa((px-2)+(idx*9), str, 10));
     } else {
       lcd.print(itoa(px+(idx*9), str, 10));
     }
     lcd.print(";");
     lcd.print(itoa(py, str, 10));
     lcd.print("p");
  }
}