Profiles and the Profile Manager
There's a lot of information about Profiles on the Microsoft msdn website. It really is essential reading for a good understanding of Profiles.However, we could summarize by saying that Microsoft suggest that the simplest way to create a new Profile is to modify an existing System Profile. That's actually easier said than done because a Profile - as used by the AsfWriter - is data in machine-readable form.
There are two basic ways in which a Profile can be modified:
- Once the AsfWriter has been assigned a Profile, parts of the Profile can be manipulated through various Interfaces on the AsfWriter.
- The Profile can be converted into a basic text file (actually XML), edited and converted back into a Profile using a special COM Object called the Profile Manager.
We'll have a look at this second method, using the Profile Manager, first.
It's useful to have a look at a Profile in human-readable form so we'll write a small application which uses the Profile Manager to convert a Profile into its XML form. As it's most likely to be one of the low resolution video-only Profiles that we want to modify, we'll use one of those profiles (WMProfile_V80_56VideoOnly). We can use virtually the same code in a 'real' application.
Start a new project and drag a TMemo and a TButton onto a Form. Give the Memo a vertical scrollbar and set Wordwrap to True. Add WMF9 to the uses section as we're working with Profiles.
uses
  Windows, Messages, SysUtils, Variants, Classes, Graphics, Controls, Forms,
  Dialogs, StdCtrls, WMF9;
Add the following code to the Button's OnClick event handler...
procedure TForm1.Button1Click(Sender: TObject);
var
    ProfileManager: IWMProfileManager;
    Profile: IWMProfile;
    nLen: LongWord;
    ProfileString: WideString;
begin
    //  Create instance of Profile Manager
    if Succeeded(WMCreateProfileManager(ProfileManager)) then
    begin
      // Load the WMProfile into the variable 'Profile'
      ProfileManager.LoadProfileById(WMProfile_V80_56VideoOnly, Profile);

      // Attempt to convert the Profile into a 'nil' String
      // This will return with the anticipated length of the String (in nLen)
      ProfileManager.SaveProfile(Profile, nil, nLen);

      // Use the length value that was returned in nLen to set the required length
      // of 'ProfileString' then convert the Profile into a String in ProfileString
      SetLength(ProfileString, nLen);
      ProfileManager.SaveProfile(Profile, PWideChar(ProfileString), nLen);

      // Remove leading/trailing whitespace from ProfileString and display in Memo
      trim(ProfileString);
      Memo1.Text:= ProfileString;
    end;
end;
After declaring a few variables, an instance of the Profile Manager is created. If this is successful, ProfileManager.LoadProfileById copies the Profile given as the first parameter into the variable Profile.
The Profile Manager is then used to convert the Profile into a WideString but, before it can do so, it needs to know how many bytes the WideString needs to be. The line ProfileManager.SaveProfile(Profile, nil, sLen) is a 'trick' to obtain this information and copy the result to sLen. After setting the length of the WideString, the Profile Manager can then be called again - this time the Profile is converted into text in ProfileString which is now the correct length to receive it.
When you click the button, the Memo displays the data from the WMProfile_V80_56VideoOnly Profile in XML form.
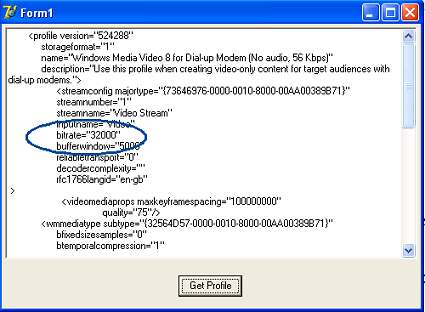
We can use the Delphi code above (without the need for the Memo) in our ASF application in order to change a System Profile. It takes a little while and a little experimenting to discover what parts of the XML file need to be edited but, for example, "bitrate=32000" is a good candidate. If a user selects a different bitrate (93kbps, for example), something along the lines of the code below could be used to change the ProfileString into NewProfileString.
var
  NewProfileString: WideString;
  :

  // Copy 'ProfileString' to 'NewProfileString' replacing every occurance
  // of bitrate="32000" with bitrate="93000"
  NewProfileString:= StringReplace(ProfileString, 'bitrate="32000"', 'bitrate="93000"',
                                 [rfReplaceAll, rfIgnoreCase]);
Finally, the Profile Manager is used to convert the new XML string into the new Profile variable, NewProfile, which can then be assigned to the AsfWriter. Note that we can't just set the AsfWriter.Profile property because we are now dealing with a modified System Profile rather than a simple DSPack constant and there is no DSPack constant for our new Profile. Instead, we need to expose the ASFWriter's IConfigAsfWriter interface and configure the new Profile through it.
var
   NewProfile: IWMProfile;
   ConfigAsfWriter: IConfigAsfWriter;
   :
   :

   ProfileManager.LoadProfileByData(PWideChar(NewProfileString), NewProfile);
   ProfileManager:= nil;

   if Succeeded(ASFWriter1.QueryInterface(IConfigAsfWriter, ConfigAsfWriter)) then
   begin

      if NewProfile <> nil then
         ConfigAsfWriter.ConfigureFilterUsingProfile(NewProfile)
      else
         ConfigAsfWriter.ConfigureFilterUsingProfileGUID(WMProfile_V80_56VideoOnly);

   end;
In the final part, we'll look at one or two techniques to manipulate the Profile after it has been assigned to the AsfWriter.