Adding Audio to the AVI file
In previous sections, we've seen how to play (render) a file and how to write live video to an AVI file. In this section, we'll see how to add audio.Adding audio to an application can be surprizingly complex because audio input devices usually have many input lines - microphone, line-in, cd audio, wave etc - and the application needs to allow the user to select between them.
To get us started and give ourselves a bit of inspiration, I'll cheat a bit with this first project by 'hard-coding' an input.
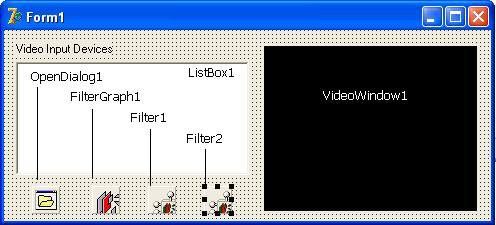
Here's our on-going project, to which I've added a second Filter - named Filter2
You may recall that we looked at the video filter's BaseFilter property and saw how it gave use direct "access" to the video sources. Let's select our new (audio) filter - Filter2 and check out its BaseFilter property. Click on the ellipsis (...) alongside the (TBaseFilter) to open the Base Filter Editor.

Look through the list of filters and open the entry for Audio Capture Sources. If you just have the single soundcard on your system, there will only be one source listed so click on it to highlight it. At the bottom right of the Base Filter Editor, you will see a list of inputs, called 'Pins'. Unfortunately, we can't use this list to select our input so, for this first audio project, we'll need to make sure we select the source we want to use in the standard Windows audio mixer panel. But, select the audio Basefilter (I've selected 'SoundMaxDigitalAudio' in the picture above) and click 'OK' to close the editor.
All we need to do now is set the audio filter's FilterGraph property to our FilterGraph. As usual, we can do that in the Delphi Object Inspector or in the program code. I'll do it in the code. So, here's the relevant section of our project with the additional code for the audio highlighted in yellow.
procedure TForm1.ListBox1Click(Sender: TObject);
var
   CaptureFile: WideString;
   Multiplexer: IBaseFilter;
   Writer: IFileSinkFilter;
begin
   if OpenDialog1.Execute then
     CaptureFile:= OpenDialog1.FileName;

   if FilterGraph1.Active then FilterGraph1.Active:= False;
   FilterGraph1.ClearGraph;

   if ListBox1.ItemIndex > -1 then
   begin
      Filter1.BaseFilter.Moniker:= SysDev.GetMoniker(ListBox1.ItemIndex);
      FilterGraph1.Active:= True;

      FilterGraph1.Mode:= gmCapture;
      Filter2.FilterGraph:= FilterGraph1;

     with FilterGraph1 as ICaptureGraphBuilder2 do
     begin
       SetOutputFileName(MEDIASUBTYPE_Avi, PWideChar(CaptureFile), Multiplexer, Writer);
       RenderStream(@PIN_CATEGORY_CAPTURE, nil, Filter1 as IBaseFilter,
                     nil, Multiplexer as IBaseFilter);

       RenderStream(@PIN_CATEGORY_PREVIEW, nil, Filter1 as IBaseFilter,
                     nil, VideoWindow1 as IBaseFilter);

       RenderStream(nil, nil, Filter2 as IBaseFilter,
                   nil, Multiplexer as IBaseFilter);
     end;
   end;

   FilterGraph1.Play;
end;
Notice how the new RenderStream doesn't specify a Pin category. A value of nil here means "use any pin that's available". Notice, also, that the input filter is Filter2 (our audio filter), as usual, there is no intermediate filter and the 'destination' filter is the Multiplexer.
Run the project and, as before, give the filename the AVI extension. Open GraphEdit and connect to our filter graph. You should see something like this. Although Intelligent Connect has added a filter or two of its own, see how the basic structure - particularly with regard to the CAPTURE, PREVIEW and Renderer filters - follows our Delphi code:

In the next section, we'll see how to enumerate the audio devices in order to allow the user to select one instead of having it hard-coded, as we've done here.