FM Transmitter - Car MP3 Player
The radio fitted in my car has no facility to play MP3 files so I decided I needed an FM Transmitter MP3 player. Although they are very inexpensive to buy, I already had virtually all of the parts to build one myself so I thought it would make an interesting project.
The only item I needed to buy was the FM transmitter module by a company called ElecHouse. It is available on eBay at various prices - search for "FM Radio Transmitter Module."
This project also needs an MP3 Player module from Embedded Adventures (which I already had in my spares box) and a 1.8" TFT display (which I also already had). There are a few different models of the display available: The one I used operates at 3.3v without needing series resistors in the data lines.
The Ciruit

An ATmega328 microcontroller is at the heart of the project and controls the MP3 player, the FM transmitter and the TFT display.
The MOD-1021 MP3 Player module uses simple 9600 Baud serial communication for commands between itself (on pins 2 and 3) and the ATmega328 (pins D2 and D3).
Operation of the MOD-1021 couldn't be simpler - it receives serial commands from the ATmega328, selects the MP3 file to play from its built-in micro-SD card and outputs right and left stereo audio on pins 4 and 5 respectively. The Busy output from the module's pin 16 is LOW when a track is playing and connects to ATmega328 input D4 to signal the microcontroller to increment the track number and send a command back to the MP3 module to start playing the next track whenever the signal goes HIGH (ie not playing).
The audio from the MP3 module feeds through the normally-closed contacts on a 3.5mm stereo socket and onwards to the audio inputs on the FM Radio Transmitter module. Audio from an outside source, such as a mobile phone or iPod, for example, can be fed to the FM transmitter instead by plugging it into the 3.5mm socket. I've tested it with the audio from an iPhone 5 and it works fine. The software doesn't know if an external audio source is in use so, although the MP3 player's audio is disconnected, it will continue to cycle merrily through the tracks unless you pause the MP3 module manually.
The FM frequency of the transmitter is set to an empty FM broadcast channel via one of the configuration options. The transmitter module uses the I2C protocol but its implementation is simplified by the use of the FM_TX library available on the ElecHouse website.
Tactile push buttons connected to ATmega328 pins D5, D6, D7 and D8 are for MODE selection (explained in a moment), UP/NEXT TRACK, PLAY/PAUSE and DOWN/PREVIUOS TRACK respectively. I used 12mm x 12mm push buttons, rather than, say, a 4-way navigation switch as I thought the buttons are easier to operate in a car environment.
The MODE Button
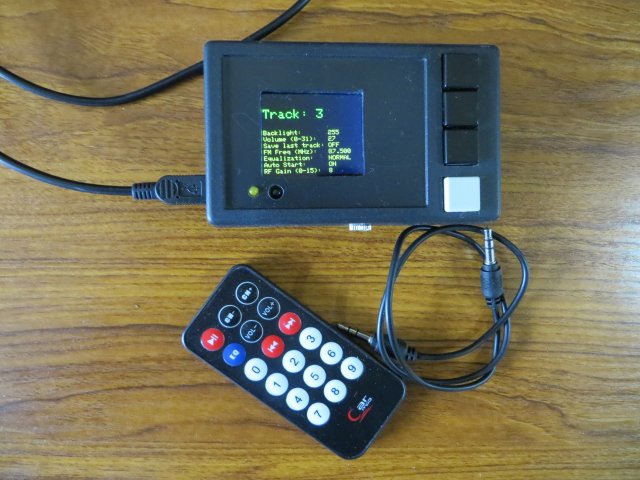
The device has several configuration options which shouldn't need to be used frequently (if at all, once set up). These are accessed with the MODE button - each option is highlighted in turn on the TFT display. The UP and DOWN buttons are then used to change the setting of the option. The configuration options are as follows:
- Backlight Adjust (0 - 255) : 0 is Off. 255 is full brightness.
- Volume (0 - 31): Normally the car radio volume control should be used. This setting should be set to a high value without audio distortion occurring.
- Save Last Track (ON/OFF): This setting determines whether the player will always begin at track 1 when power is applied or if it carries on from the last track played.
- FM Frequency (87.5 - 108 MHz): This is set to an unused radio frequency. It shouldn't need changing once set.
- Equalization (Normal/Pop/Rock/Jazz/Classical/Bass): The MP3 player module can alter the audio tone. It's easier to leave this on NORMAL and use the car radio's tone controls.
- Auto Start (ON/OFF): Due to limited space in the enclosure, the device has no ON/OFF switch. This setting determines whether the first track starts playing immediately power is applied or whether the NEXT button has to be pushed first.
- RF Gain (0 - 15): This is an optional setting determined by the software. The FM-Transmitter library (as downloaded from the ElecHouse website) has a default
value of 4 for the RF Gain. By un-commenting a line in the FM-TX library, the RF Gain can be user-defined. A higher gain gives more RF power but may infringe local
regulations. Use the lowest setting consistent with the car radio getting a good signal and, once the device is in use, ensure the transmitter's signal cannot be received outside your car!
I've listed the options on the TFT display in the order I think they're most likely to be needed. Adjusting the TFT backlight may be the most frequently needed if the display is too bright at night. The Volume may need turning down if a particularly loud MP3 track is over-loading the transmitter input, and so on.
This video gives an idea of the various options in action. (Sorry about the music; it's generic loyalty-free stuff that seems to keep YouTube from complaining):
The Infra Red Sensor
Using the push buttons for track-selection is a bit limited so the project is equipped with an infra-red sensor to be used in conjunction with a standard infra red remote. The software allows any track number between 1 and 999 to be entered. One, two or three digits can be entered - if less than three digits are entered, the software will assume a two (or one) digit number is intended if no additional digit is entered within 2 seconds.I used a cheap remote control pad (see the photo at the top of the page) but you can use whatever remote you want. There is provision in the software to retrieve the 'codes' sent by any remote on the Arduino IDE's Serial monitor. The returned values are then entered into the appropriate section of the project's software.
The Power Supply
All of the modules operate at 3.3 volts so an MCP1702-3302E 250mA LDO regulator is used. The regulator is only rated at up to 13.2v input but,as I already have a double 12v to 5v USB auxilliary socket adapter in the car, I supply the project with 5 volts through a mini-USB socket. I don't recommend using the cars nominal "12 volt" supply as it's likely to exceed the regulator's upper limit in both voltage and in power dissipation. The circuit takes about 70mA and includes a 250mA resettable fuse.