Introduction
MP3 Player Comparison
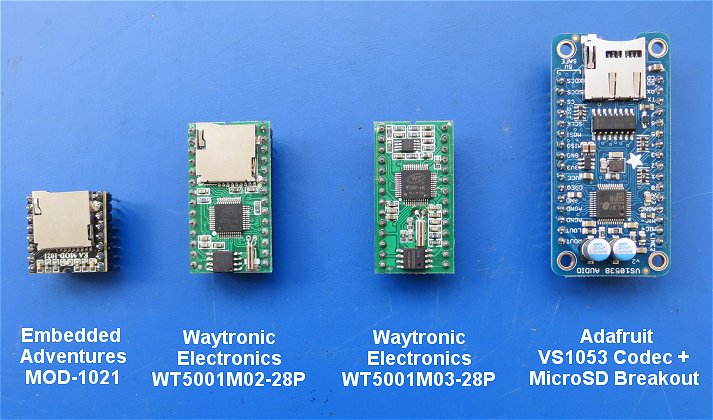
I've acquired a few different Arduino-compatible MP3 Player modules over the last few months. Although they're all very similar, they each have good and bad points which I'll try to compare here.
The Embedded Adventures MOD-1021
This module (and similar clones ) is based on the YX5200-24SS IC. All of the English language documentation that I've been able to find is for the complete module rather than for the chip itself.It can handle up to 32GB microSD cards and has a built in audio amplifier which claims to be 3 watts, although it's unclear whether that's total or per-channel. My guess is that it's total peak-to-peak output power.
I designed a simple portable MP3 player based on this module and you'll find more information there. A limitation of this module, in common with others, is that the micro-SD card is built into the module. This makes it difficuult, although not impossible, to use a full-size SD card socket instead. Also, because the microSD card is permanently wired to the IC, without major modification it's not possible the have the Arduino read the contents of the SD card.
The module has a breadboard-friendly 0.6" width. It's supplied by Embedded Adventures without the two rows of 8-way header pins which you need to supply and solder yourself.
Waytronic Electronics WT5001M02-28P
The Waytronic Electronics WT50001M02-28P is similar to the MOD-1021 except it uses the WT5001-48L IC in addition to the voltage regulator and audio ICs.As with the MOD-1021 Module, the micro-SD card holder is permanently wired to dedicated pins on the main IC. Both seem to use the native SD protocol to transfer data from the micro-SD card, rather than the usual micro-controller SPI protocol.
What this means, in practice, is that it's not possible for the micro-controller to (easily) access the micro-SD card in order to read, for example, filenames.
The module's two rows of pins are 0.7" apart which, although not standard, are still breadboard-friendly.
Both modules simply access MP3 tracks by the 'number' - that is the order they were originally saved to the card. There is no way to access the actual filenames.
Adafruit VS1053 Codec & Micro-SD Breakout
The Adafruit VS1053 Codec & Micro-SD Breakou is based on the VS10538 IC. The audio output is capable of driving a pair of headphones, but not a speaker.The module is 0.8" wide but it does fit a breadboard and leave a couple of rows of breadboard holes clear for connections.
It's a much more versatile module that the previous two and can even record onto the micro-SD card in OGG format.
For me, one of its main attractions is that connections to the micro-SD card holder are entirely separate from the connections to the VS10538 IC. What this means is that it's possible to read the filenames, etc, using the standard Arduino <SD> library. Instead of having the micro-SD card connected directly to the MP3 chip, data transfer from the card to the chip is achieved using the Arduino standard SPI protocol - the chip using an Arduino Interrupt pin to request more data as required.
The Adafruit example states that, while the module is playing a track, other "housekeeping" functions can be carried out: for example, switching LEDs, reading buttons etc. Whilst this is true to some extent, keeping the module supplied with data takes up a lot of the Arduino's processing power and, as it's interrupt driven, makes using other interrupt-driven libraries (such as an infra-red remote control) difficult, if not impossible to use.
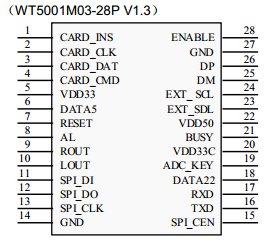
Waytronic Electronics WT5001M03-28P
I've left this one until last because it's the module I've used in my Home MP3 player. It's two rows of pins are the standard 0.6" apart. Otherwise, it's specifications are very similar to the WT50001M02-28P except for the omission of the micro-SD card holder. If you look at the appropriate section of the datasheet (or the diagram below), you'll notice that the connections for the SD card are brought out to pins 1 to 5 on the module:
One advantage is immediately obvious: You get to choose whether to use a micro-SD card or a full-sized one. But the other advantage is that it enables you to switch the SD card between the module and an Arduino. This gives the same advantage as the Adafruit module (being able to read what's on the card) without the disadvantage of having to use the Arduino to carry the heavy load of transferring data when playing the file.
The only slight disadvantage is that it takes a couple of standard CMOS ICs to switch the SD card between the Arduino and the MP3 Module.
Availability: I got mine from AliExpress.
Changing Buses
It's reasonably straightforward switching the SD card from one bus to another but bear in mind, the WT5001M03-28P module uses the native SD protocol's bidirectional bus to "talk" to the SD card whereas the Arduino uses it's unidirectional SPI bus.The signals from the MP3 Module are at the correct 3v3 level which means two things: (1) The SD card must use a "bare" card-holder without any built-in level-shifting and (2) the 5 volt signals from the Arduino will need to be reduced to 3v3 before being applied to the SD card. The MP3 module thoughtfully provides a 3v3 supply for the SD card (and, in our case, for one of the CMOS ICs).
Although there maybe more elegant solutions, this is how I did it:
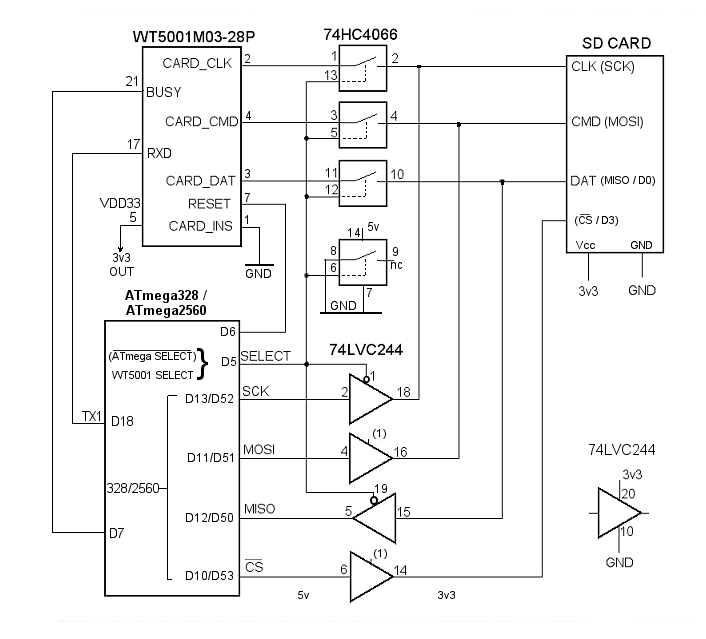
The 74HC4066 is a quad bidirectional switch with tri-state outputs. Only three of the switches are used. When pins 5, 12 and 13 are taken HIGH with the ATmega2560 D5 output, the 74HC4066 'switches' close and the outputs are connected to the SD card, allowing the WT5001 bidirectional bus signals through. The same HIGH signal disables the 74LVC244, which also has tri-state outputs, so the Arduino SPI bus is disconnected from the SD card.
When ATmega2560 output D5 is taken LOW, the 74HC4066 is disabled, it's outputs are tri-stated and disconnected from the SD card. The same LOW signal, enables the 74LVC244 so the ATmega2560's SPI bus is connected to the SD card. Luckily, the 74HC4066 is enabled with a HIGH signal and the 74LVC244 is enabled with a LOW signal so the same ATmega2560 output can be used to perform the switch-over.
The 74LVC244 is an octal buffer/driver, arranged as two groups of four with an active LOW enable input for each group.
The LVC version of the 74LVC244 must be used here. It requires a 3.3 volt supply but its inputs are 5 volt tolerant. Therefore, the 5 volt SCK, MOSI and CS outputs from the ATmega2560 can be applied to its inputs but they emerge as 3.3 volt signals to the SD card.
The WT5001 module doesn't like losing its connection with the SD card so, after the connection is re-established, it's necessary to RESET the module - accomplished with a short LOW pulse on its RESET pin from ATmega2560 output D6. After the RESET, a delay of around 1 second is required before it will start to accept commands on its RXD pin again. After the RESET and delay, any other settings, such as Volume, need to be sent to the module again.
Likewise, the ATmega's <SD> library doesn't like losing the SPI connection to the SD card once it's been established so a new SD.begin(CS_pin) is required whenever the SPI bus is reconnected.
The drawing above shows pin numbers for both the Arduino Uno and the Arduino mega2560. The code for the MP3 player (including a 1.8" TFT display and an Infra Red remote sensor) will just fit in the Uno but, as I also wanted to include an FM Radio in the design, I decided to use the mega2560. The main pin-numbering differences are for the SPI bus. The mega2560 also has additional hardware Serial Ports - the Uno will need to use the SoftwareSerial library instead.