Streaming Video
Streaming video is a sequence of images that are sent in compressed form over the Internet. With streaming video, a web user does not have to wait to download a large file before seeing the video. Instead, the video is sent in a continuous stream and is played as it arrives.The user needs a player, which is a special program that uncompresses and sends video data to the display. A player can be either an integral part of a browser or downloaded from the software maker's web site.
As with much of the browser & web technology, there is no absolute standardization in how the video is sent and received. Each requires its own, proprietary, software at both 'ends' of the link.
The two major contenders for streaming video are RealSystem G2 from RealNetwork and Microsoft Windows Media Technologies. Microsoft uses the standard MPEG compression for video. RealNetwork use proprietary compression algorithms.
Microsoft's technology allows streaming video at up to 8 Mbps but, for most web users, the streaming video will be limited to the data rates of the connection - typically up to 128 Kbps with an ADSL connection.
Because the different formats are incompatible, you need to decide which technolgy to use. It really comes down to making your video accessible to the largest audience.
Microsoft's Media Player is already included with the vast majority of Browsers in use today so I decided to use Microsoft's Media technology.
I've found two applications which are able to broadcast video compatible with Windows media Player: Windows Media Encoder, from Microsoft, and an all-in-one media player and broadcaster called the "Star Media Center."
As an alternative, I've recently finished work on an encoder of my own. Although it lacks the " frills" of media Encoder and Star Media Center, it is simple to set up and seems to work with all the video sources I've been able to try. See number (3) MediaMaster below for a link elsewhere on my site.
(1) The Star Media Center
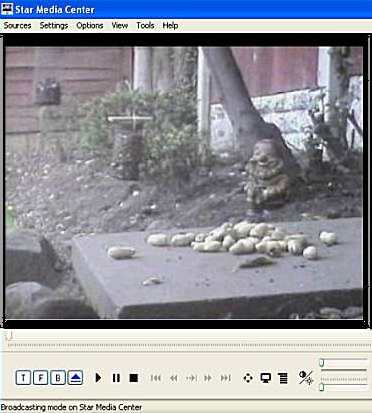 |
I've only recently discovered this program and, so far, it seems at least as stable as Windows Media
Encoder although it does lack a few useful features - such as the ability to block IP addresses.
You'll find a full step-by-step guide on using this program to broadcast video at
|
(2) Microsoft Media Encoder
 |
To broadcast the video, you need to Microsoft seem to have stopped development of the Encoder but it's available for download here. Full instructions on setting it up can be found below. |
(3) MediaMaster
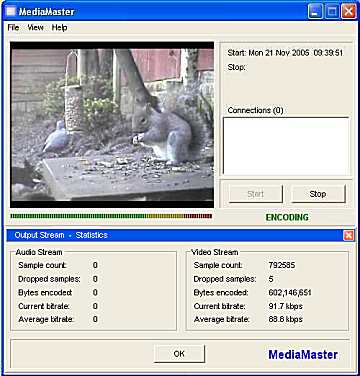 |
Alternatively, if you want something really simple to set up with the minimum of settings to make, I've recently finished work on a simple encoder of my own. |
However, lets's assume that you prefer to give Windows Media Encoder a try...
Setting up Windows Media Encoder
Although setting up the encoder is relatively simple, there seem to be some video sources which are difficult for the encoder to work with and, unfortunately, the encoder rarely fails gracefully. So, until you have it properly configured and tamed, be prepared to see your computer lock up and crash. Even the rarely-seen-these-days blue screen of death may make a guest appearance from time to time.
Step 1 - Select the video deviceMake sure your video source is connected to the PC and working correctly and start Media Encoder. From the panel which opens, select Broadcast a live event.Select your video device from the drop-down list. You may also be able to click the Configure button which gives access to the video device's driver. Then click the Next button. | 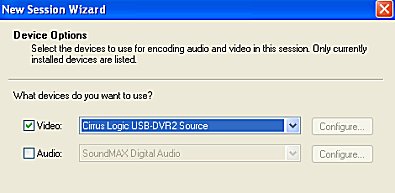
|
Step 2 - Set Broadcast MethodClick the Pull from the encoder radio button. This allows up to five visitors to connect to the encoder simultaneously and 'pull' the video stream from it. For a normal ADSL (or even the newer SDSL) five simulataneous visitors are more than enough.Click the Next button. |
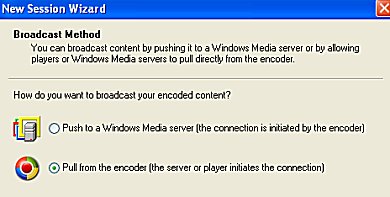
|
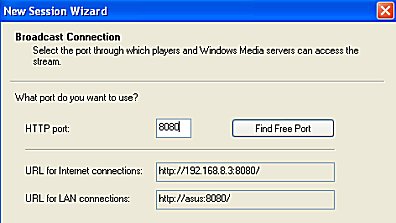
Step 3 - Internet ConnectionType in the Port number you want to use. This must be a unique number not used by any other server you may be running.If you are connected to the internet through a router, the box alongside the label - URL for Internet connections - is not necessarily correct but it doesn't affect how the Encoder works. Click the Next button. |
|
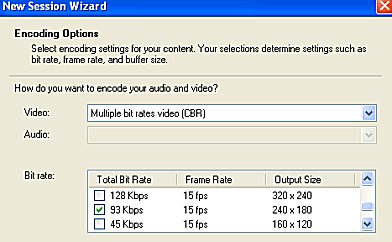
Step 4 - Encoding OptionsLeave the top drop-down list as Multiple bit rates video (CBR) and select a suitable bit rate from the list. Remember that the connection speed will be limited to your upload speed and that the total bandwidth used will be the sum of the bandwidth used by your simultaneous visitors.You can select more than one bit rate - the highest will be 'offered' to each visitor until there is insufficient bandwidth. then the next lower bit rate will be offered, and so on. Click the Finish button. |
|
Now you see it...If, at this point, you haven't seen a "blue screen of death", you're doing well. If you can see the video displayed in the Input video window, you're doing very well!Change the Display to Output or Both and click the green Start Encoding button. If you can see the video in the Output window, you're in business. If you've just re-booted your computer, welcome back and continue to the next page for some suggestions including what I've found to be a virtually guaranteed method of getting the Encoder running! |

|
© Copyright