Using the Camera Controller
The controller is, essentially, two separate controllers - the shutter controller and a remote flash controller - which can be used independently or linked together.The controller is configured using a menu system as below:
 When the unit is first switched on, the screen shown here will be
displayed - although the Menu Values and the numerical values shown in the Status Line will probably be
different.
When the unit is first switched on, the screen shown here will be
displayed - although the Menu Values and the numerical values shown in the Status Line will probably be
different.
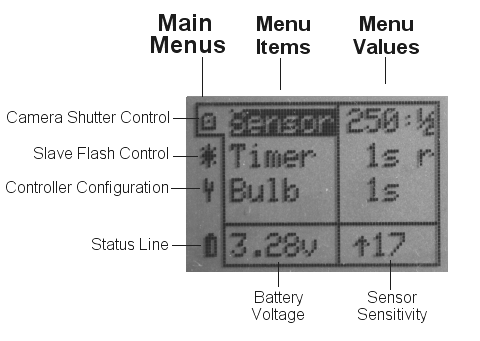
Main Menus
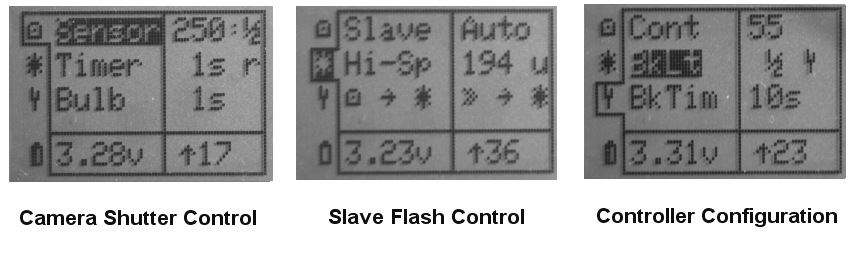
The controller has three main menus indicated by the column of Icons at the extreme left of the display.This photo is showing the Camera Shutter Control menu.
The other menus are the Slave Flash Control and the Controller Configuration menus.
The various individual items of the menus are configured by using the 4-way navigation buttons to move the Cursor,
(indicated with the highlighted item). Here, Sensor in the Camera Shutter menu is highlighted.
Moving Between Menus
To move between Menus, click the Left navigation button until an Icon in the Main Menus column is highlighted, then use the Down and Up navigation buttons to display the Slave Flash, Configuration and back to the Camera Shutter menu.Once the required Main Menu is displayed, one click of the Right navigation button will move the cursor onto one of that menu's Menu Items.
All three Main Menus are shown below:
Interaction Between Menus
Although the items in each menu are configured separately, the settings in one menu will affect actions in other menus:For example, the Sensor menu has items to configure the time the controller allows bewteen focusing and firing the shutter (the focusing time) and the length of time the shutter remains "pressed" afterwards (the shutter hold time, equivalent to the length of time the shutter release is held down). Both of these setting will come into play whenever the focus and shutter are operated. Except in Bulb when only the focusing time is taken into account.
The Camera Shutter Control Menu
Sensor
Sensor is primarily the on-board photodiode used to detect changes in lighting level (either falling or rising). Simple uses could be breaking a light beam (falling) or a security light coming on (rising), for example.If an external sensor is plugged into the unit's Ext Sensor socket, the triggering device could be almost anything - a microphone, a pressure sensor etc, etc. (The on-board photodiode is disconnected when an external sensor is plugged in).
Sensor Sensitivity
The Controller tries to keep track of the 'ambient' conditions so that it will only respond to a sudden change. The sensor sensitivty adjustment (displayed at the bottom right of the display) sets the estimated difference that will be required to trigger the Controller. It is adjusted by rotating the thumbwheel on the navigation switch. The upwards-pointing arrow indicates that a rising change is required to trigger the unit. Rotating the thumbwheel anti-clockwise (CCW) will reduce the value displayed (increasing the sensitivity) until a downward-pointing arrow is displayed, indicating that a falling change will trigger the unit.The sensitivity can be adjusted almost any time its value is displayed at the bottom right of the screen. The only two exceptions are when the Camera Shutter -> Sensor -> Value or Slave Flash -> Hi-Speed -> Value is highlighted. In these cases, rotating the thumbwheel will increment or decrement the appropriate Value instead of adjusting the sensitivity.
Sensor Settings
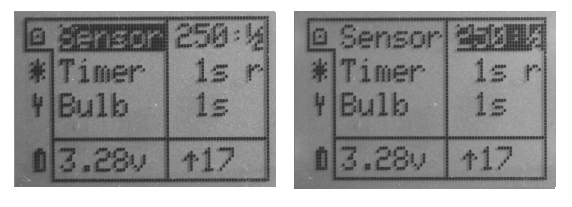 Navigate to Shutter Control -> Sensor -> Values as shown here.
There are two timing values associated with the Sensor menu - both control the shutter timing and both are "global" in that
they determine the shutter timing throughout the Controller.
Focusing Time
The left hand value (250 in the photo above) is the number of milliseconds between activation of the focus and shutter controls - the focusing time. It's value is changed by highlighting the number in the Values column and using the Up and Down navigation buttons. The value changes in 10ms increments from 0 to 990ms. Rotating the navigation switch thumbwheel will also change this value quickly.In practice, if this time is too short, the camera will fire the shutter anyway once it's achieved focus, but this focusing time is additional to the Shutter hold time so may add some versatility.....
Shutter Hold Time
The figure on the right hand side of the Values column (in this photo showing ½) is the time, in seconds, that the shutter will remain "held" down. The value is changed with the OK button. Possible values are: ¼, ½, 1 and 2 seconds. This value is in addition to the focusing time so, if required, the total of almost 3 seconds is available after the sensor triggers until the shutter is released.As mentioned above, the focusing time and the shutter hold time will affect how the shutter behaves in Sensor, Timer, Slave and Hi-Speed. Only the focusing time will affect the shutter behaviour in Bulb mode because the Bulb timer setting "replaces" the usual shutter hold time.
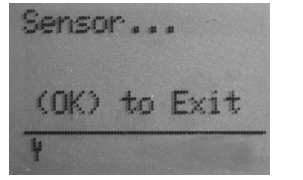 Once everything is set up and ready to go, the Controller is "armed" by
navigating back to the Sensor menu item in the Menu Items column (one click Left) and then clicking the OK button.
Once everything is set up and ready to go, the Controller is "armed" by
navigating back to the Sensor menu item in the Menu Items column (one click Left) and then clicking the OK button.
The Controller will stay on the screen shown to the left indefinitely, firing the shutter whenever the trigger source becomes "active", until the OK button is pressed again, in order to "escape" to the main menu.
The controller will "re-assess" the ambient conditions every 5 seconds.
The spanner at the left of the "Status Line" indicates that Test Mode is enabled so the display's backlight should flash briefly
twice whenever the shutter fires. Test Mode is explained in the Controller Configuration section below.
Timer & Bulb
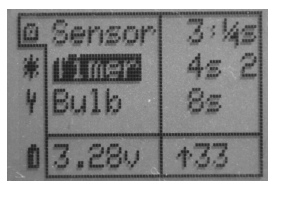 The Timer and Bulb options are fairly self-explanatory. In Timer mode, the controller will wait for the set time
to elapse before firing the shutter. The value is changed by using the Up and Down buttons. There is a pre-set
range of times as follows (each value being approximately twice the previous value):
The Timer and Bulb options are fairly self-explanatory. In Timer mode, the controller will wait for the set time
to elapse before firing the shutter. The value is changed by using the Up and Down buttons. There is a pre-set
range of times as follows (each value being approximately twice the previous value):1s, 2s, 4s, 8s, 15s, 30s, 1m, 2m, 4m, 8m, 15m, 30m, 1h, 2h, 4h, 8h
The '2' to the right of the Timer value in this photo indicates that the timer will repeat twice before returning to the main Camera Control menu. Use the OK button to cycle between 1, 2, 3, 4 5 and 'r'. When set to 'r', the timer will repeat indefinitely.
The 0s, ¼s (250ms), ½s (500ms) and 1 second "focusing time" options in the Sensor settings also apply to Timer and Bulb but bear in mind that it wouldn't make sense to have a Focus Delay of 1 second with a Timer setting less than at least 2 seconds - although the Controller won't stop you from trying!.
For the Bulb function to work, the camera shutter must obviously be set to 'B'.
As with the Sensor menu, use the OK button to Start and then again to Exit the Timer and Bulb screens and return to the main Camera Control menu. To conserve battery power, the Timer and Bulb modes put the controller's processor in "sleep mode". It wakes briefly every second to check if the set time has elapsed so it's necessary to hold the OK button down for 1 second in order to Exit these modes. The screen will be blank while these modes are active. If Test Mode is enabled, the display backlight will flash briefly once every 10 seconds to indicate the controller is active and running.
If the Timer (r)epeat is not active, the Controller will return to the Camera Control menu automatically after the elapsed number of timed cycles. Bulb always returns automatically.
Note that, with Sensor, Timer and Bulb, the display cursor (highlighted item) must be in the Menu Items column for the OK button to start the selected function.
The Slave Flash Control Menu
Slave
 This is the main "workhorse" of the Slave Flash Control menu.
The setting in the
The value is adjusted with the Up and Down buttons. Available values are: 0, 1, 2, 3, 4, Auto.
Pressing OK will return directly to Auto without cycling through the other options.
In Auto, the Controller attempts to intelligently work out when the main flash from the camera is due.It works reliably
with my Nikon D3100 but it hasn't been tested with other cameras. There must be at least 1 one pre-flash for Auto to work. Cameras without a pre-flash should set a value of 0.
As always, highlight Slave in the Menu Items column, then hit OK to start.
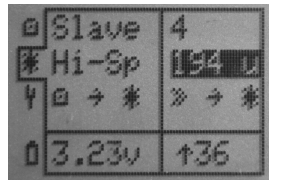
The pre-set time is set by highlighting the value in the Values column and using the Up, Down buttons. The range of values is
from 0 to 999. The longer the button is held down, the faster the value increments or decrements.
Rotating the navigation switch thumbwheel will also change the value quickly in units of '10'. Use the Up and Down
buttons to 'fine tune' the value.
The u to the right of the value represents microseconds. Click the OK button to switch to m for
milliseconds. So, in theory, the range of the time delay is between 0µs and 999ms. In practice, I estimate about 20µs will be
the minimum time - although I haven't, as yet, measured it.
In theory, it should be possible to adjust the Hi-Sp time for front or rear curtain flash - though I'm not sure what effect this will have with the Nikon's vertical-travel focal plane shutter!
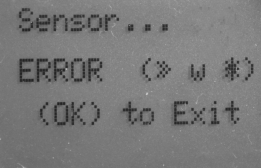
The photo (left) shows that, the Controller was initiated from the
Camera Control -> Sensor menu and the display is showing an Error message from the Shutter to Slave Flash with Watchdog function. The watchdog timeout is set to 750ms.
The BkLt setting sets the display LED backlight brightness. Settings are Off, Half, Full, Auto.
The 'Spanner' symbol at the right hand side of the Values column needs some explanation:
As with all items on the right hand column, its value can be changed by using the OK button. In this case the otions
are On or Off - ie either display the spanner or not.
The spanner indicates "test mode". In order to keep power consumption to a minimum, the Controller doesn't have separate LEDs
to indicate whether the shutter or the flash has been asked to fire. When 'test mode' is On, the display's LED backlight will flash twice
briefly whenever the shutter is asked to fire and once whenever the slave flash is asked to fire. It's a useful indicator that
the controller is working and the sensitivity is adjusted correctly before plugging in the camera or slave flash.
The shutter or flash will fire before the LED indicator flashes to avoid any unnecessary delays. To avoid unnecessary battery drain,
this indicator only works in Camera Control -> Sensor and Slave Fash Control -> Slave modes.
The BkTim setting sets how long the LED backlight will remain lit (between 5 and 20 seconds). Any button press will activate the backlight for the set time.
In Timer and Bulb modes, the processor is put in Power Down for most of the time which reduces the power consumption
dramatically. In these modes, the LED backlight is turned off after about 5 seconds regardless of the setting here in the Configuration menu.
See a previous page for a discussion
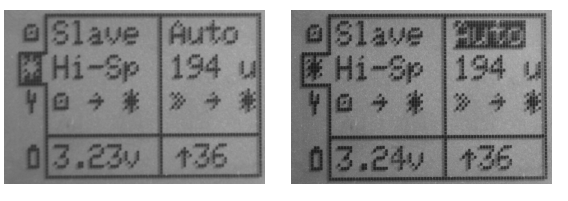
about the Auto setting.Hi-Speed
 This mode is designed specifically to capture high speed events - balloons bursting, corks popping etc. When activated, by pressing the
OK button (when Hi-Sp is highlighted), the Contoller opens the camera's shutter and waits for the sensor to trigger. It then delays for an additional pre-set
time before firing the Slave flash. It then waits for the Shutter Hold Time before closing the camera's shutter. The camera obviously needs to be set to 'B' for this to work.
This mode is designed specifically to capture high speed events - balloons bursting, corks popping etc. When activated, by pressing the
OK button (when Hi-Sp is highlighted), the Contoller opens the camera's shutter and waits for the sensor to trigger. It then delays for an additional pre-set
time before firing the Slave flash. It then waits for the Shutter Hold Time before closing the camera's shutter. The camera obviously needs to be set to 'B' for this to work.Camera -to- Slave
In normal operation, the Controller can control the camera or the slave flash.
In this mode it can control both. The action is Started in the Camera Control menu but the effects "trickle through"
to the Slave option in Slave Flash Control menu. It has five setting options in the Values column:
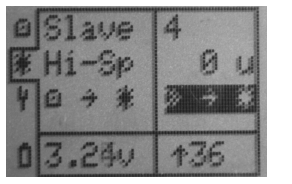
 Shutter to Slave Flash In this mode, when the Controller activates the shutter (ie after any focusing
delay), it also fires the Slave flash - but only after the delay time set in the Hi-Sp menu item:
Shutter to Slave Flash In this mode, when the Controller activates the shutter (ie after any focusing
delay), it also fires the Slave flash - but only after the delay time set in the Hi-Sp menu item:
Use this mode when you don't want the camera's flash to fire but you do want the slave flash. Camera Flash to Slave Flash In this mode, the camera's flash will trigger the Slave flash. The difference between
this and the normal Slave option is that the Controller also (and primarily) controls the firing of the camera.
However, the pre-flash setting of the Slave will still be 'in force'.
Camera Flash to Slave Flash In this mode, the camera's flash will trigger the Slave flash. The difference between
this and the normal Slave option is that the Controller also (and primarily) controls the firing of the camera.
However, the pre-flash setting of the Slave will still be 'in force'.
 Shutter to Slave Flash with Watchdog This is the same as option 1 except the Controller will stop
if the Slave flash fails to fire.
Shutter to Slave Flash with Watchdog This is the same as option 1 except the Controller will stop
if the Slave flash fails to fire. Camera Flash to Slave Flash with Watchdog This is the same as option 2 except the Controller will stop
if the Slave flash fails to fire. The watchdog timeout is set to 750ms.
Camera Flash to Slave Flash with Watchdog This is the same as option 2 except the Controller will stop
if the Slave flash fails to fire. The watchdog timeout is set to 750ms. Breaks the 'link' between the Camera Control menu and the Flash Control menu. Press the OK button to skip directly to the Off setting.
The Controller Configuration Menu
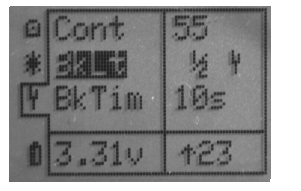 Most of the options here are fairly obvious. Cont adjusts the display's
contrast. Be careful not to reduce the contrast to a point at which the display can't be seen and then navigate out of the Configuration menu! If you should do this, ALL of the Controller's default settings will be restored by switching off the
power and switching back on while holding down the OK button. The Controller should start up on the Configuration
page with an average Contrast setting. The Contrast Value will be highlighted (even if the display doesn't allow you to see it)
so the Up and Down buttons should adjust the contrast to a suitable value.
Most of the options here are fairly obvious. Cont adjusts the display's
contrast. Be careful not to reduce the contrast to a point at which the display can't be seen and then navigate out of the Configuration menu! If you should do this, ALL of the Controller's default settings will be restored by switching off the
power and switching back on while holding down the OK button. The Controller should start up on the Configuration
page with an average Contrast setting. The Contrast Value will be highlighted (even if the display doesn't allow you to see it)
so the Up and Down buttons should adjust the contrast to a suitable value.